This little write up documents how to manually apply my feature change to the VitaDock+ project to enable the use of Aux Audio.
This is not an official process
If something does not work please contact me rather than logging an issue on the VitaDock+ repostory. I doubt anyone will see my ramblings but i don’t want to cause any extra work for those maintaining the official project!
TLDR; Get to the point.
The VitaDock+ is a fantastic project, you can see it here.
It allows you, in combination with some PSVita plugins, to stream audio and video from your PSVita to your telly using a RPi. Essentially it gives you an experience very close to the Nintendo Switch.
When combined with a nice pretty little 3D printed dock its a really impressive setup.
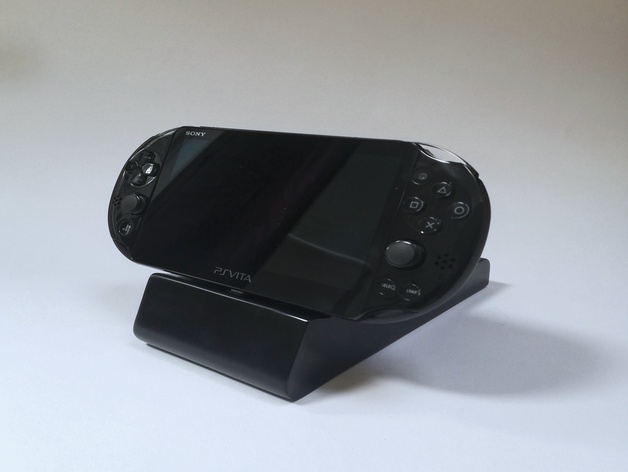
Image credit to the 3D model creator here
By default You are expected to use Bluetooth Audio and pair the PSVita with the RPi. I allong with others on the VitaDock(+) Discord server have had issues getting the two to pair. It seems to be very particular about the dongles it will use.
Once you have managed to pair them you have to manually connect and disconnect the RPi from within the PSVitas settings. This is a rather tedious process IMHO.
I decided to write a feature allowing someone to choose between Bluetooth audio or Aux audio. This feature is currently in a Pull Request (you can view that here) however untill that gets merged you can manually apply those changes instead.
Read below to figure out how.
Lets do it
Before doing this work don’t connect the PSVita to the RPi.
- Deploy the Experimental VitaDock+ V2 image here
- The Raspberry Pi Imager here can be used.
- Once deployed insert the SD into your RPi and boot it for the first time. Let it do its first time setup.
- Now you need to copy the required files onto your RPi, how you do that is upto you (SSH, thumb drive, floppy disk…) however ensure you copy the following files to the RPi
- Download the files needed from my fork here
- Click the green
codebutton and selectDownload Zip - Copy the following files over to the pi:
Location in Zip Location on RPi All the files ending in .shlocated in/home/pi/home/pivitadock.conflocated in/home/pi/home/piauxAudio.pnglocated in/home/pi/Pictures/Icons/home/pi/Pictures/IconsaucAudioConfigure.pnglocated in/home/pi/Pictures/Icons/home/pi/Pictures/Icons
- Once copied you need to take ownership of the
.shfiles and mark them as executable- from a terminal run
cd ~ && sudo chown pi *.sh && chmod +rwx *.sh
- from a terminal run
- Now you need to add the menu items, this is done with the
menulibretool- open a terminal and run
menulibre - You may see warning messages logged but this is fine, wait till the tool opens
- open a terminal and run
- when the tools GUI opens you should see the custom menu represented on the left
- You may need to expand the
Optionsitem
- You may need to expand the
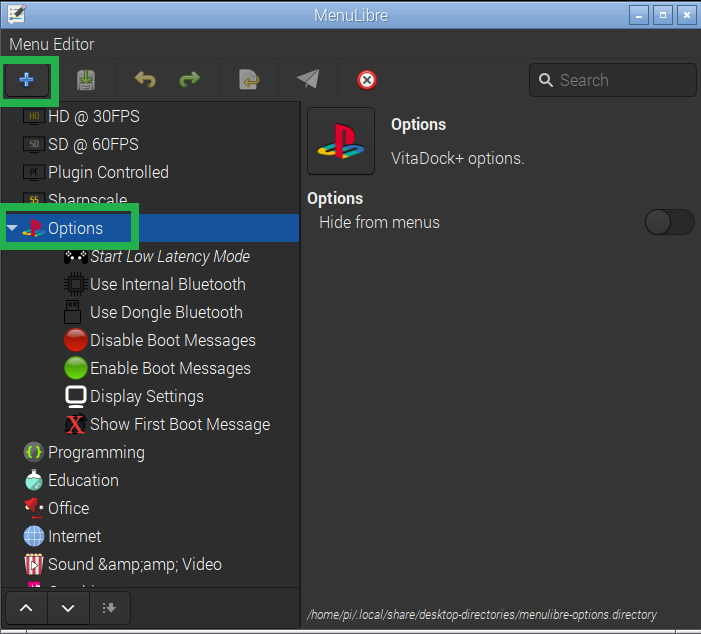 Menu Libre Tool
- With the
Optionsmenu highlighted click the+button in the top left. - Now add the
Enable Auxmenu item. Set the settings as seen in the image below. Click the icon on the left to select theauxAudio.pngimage coppied earlier.- Be sure to tick the
Run In Terminaltick box. - Note the command begins with
./ - Once set click the
savebutton in the top left.
- Be sure to tick the
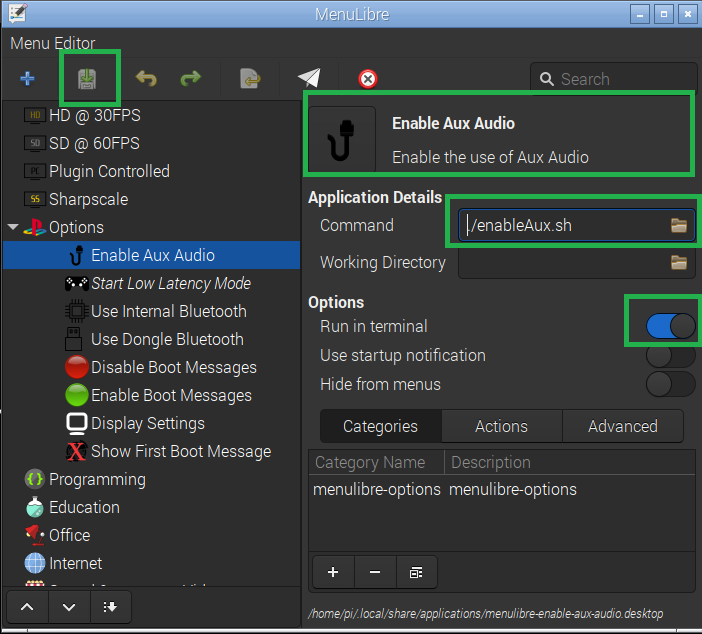 Aux Menu item settings
- Now add the
Configure Auxmenu item following the same approach as above.- Note the command begins with
./
- Note the command begins with
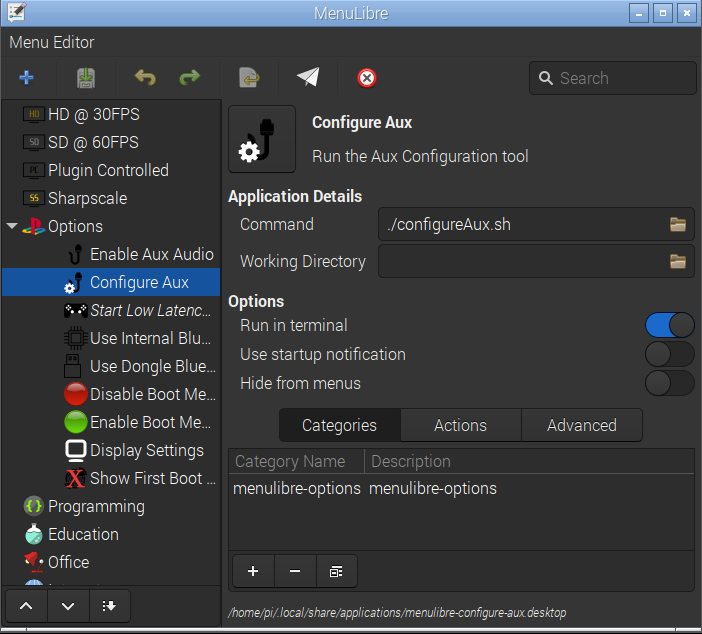 Configure Aux Menu item settings
- You can now close
Menu Libre. - Insert the USB Audio capture device.
- Now reboot the pi
- Launch the menu item
Enable Aux Audio- This will launch the
Aux Audio Configuration toolfor you.
- This will launch the
- There are a few information screens to read through, press
enterto continue. - Now select the USB Audio capture device, there will most likely only be one option to choose from.
- The name you see will be different to mine
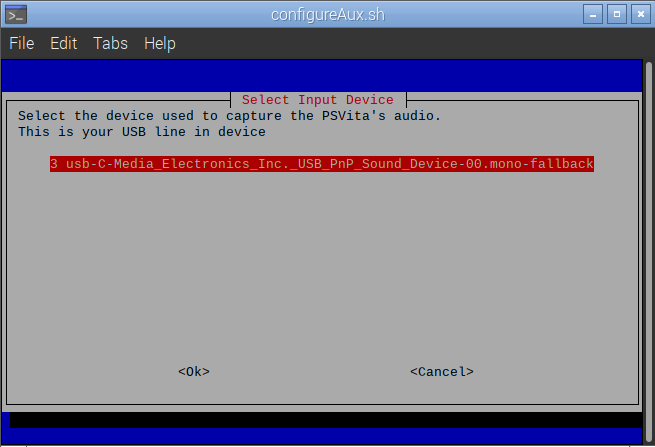 Select USB Audio Capture Device
- Next select the audio output device, this is most likely the HDMI output which will be auto selected.
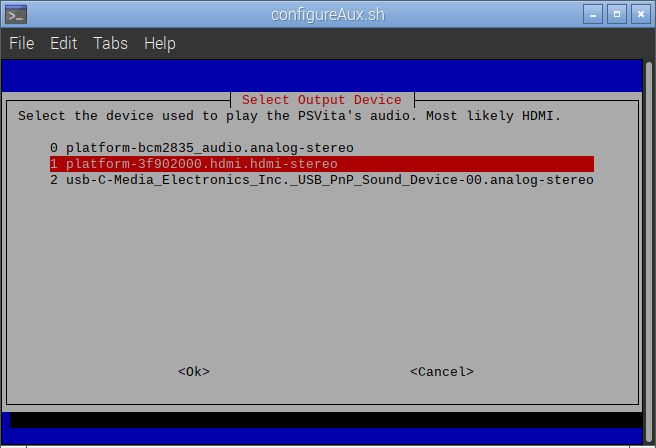 Select the output audio device
- Now the Aux audio is fully configured, however you can re-run the configuration tool by selecting its menu item you added earlier.
- Connect the Vita to the RPi, don’t forget to use a ground loop isolater to remove the hum.
- You should now be able to see and hear your vita through the TV!
Hi, my names Stephen Cooper, I'm a software engineer specialising in web-based technologies.
I'm probably not qualified to talk to you about what ever it is I've just talked to you about.
Why not reach out on Twitter to see what I'm upto?